This
section describes pool fundamentals that apply to both Virtual Pool 3 and pool
in general. Studying this section
will improve both your real and virtual games.
One major advantage you have in Virtual Pool 3 is a perfect pool stroke.
The cue stick is guaranteed to stroke straight and put spin on the cue
ball just like a championship-caliber player.
To play well, edge and hone your speed control.
Throughout this section, you will find tips for using Virtual Pool 3.
Virtual
Pool 3 allows you to change the position of the cue tip on the ball - and
therefore the path of the ball - just like in the real game. Altering the position of the cue tip with the E
key will alter the path that the balls take.
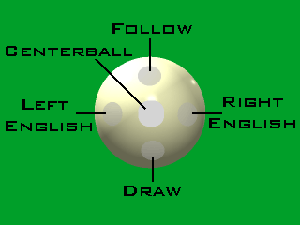
The diagram below shows the terminology for different cue tip positions on the side of the cue ball.
Combinations
of these are expressed as high right (follow and right) English or low left
(draw and left) English. Distances
from center of cue are usually expressed in cue tips, as in: ‘‘follow with
half a cue tip of right.’‘ Virtual
Pool 3 allows you to be very precise with cue tip placement.
You
might want to start out using center-ball hits only.
Then, when you feel confident enough with the game controls to add a
little more flair to your shots, practice using follow and draw to change cue
ball paths. Follow and draw have
the most effect on shots with less cut angles.
English has its greatest effect on the cue ball’s path when the ball
ricochets off of a rail.
Practice
aiming shots initially using center ball hits.
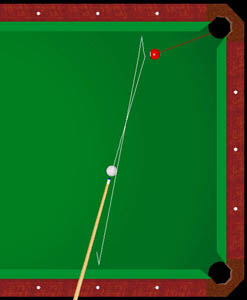
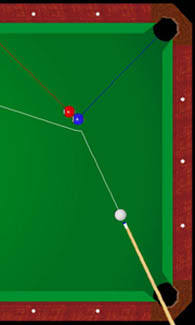
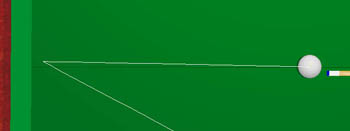
The diagram below shows the place the cue ball must be when it contacts
the object ball to sink the ball in the corner pocket.
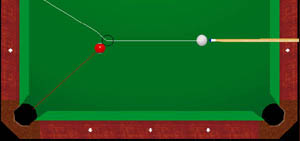
One
technique of aiming is to imagine a ball in this position and try to hit the
imaginary ball full-on.
If
you can hit the object ball with the cue ball and bounce the object ball off one
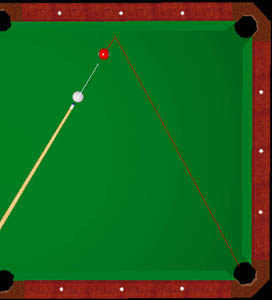
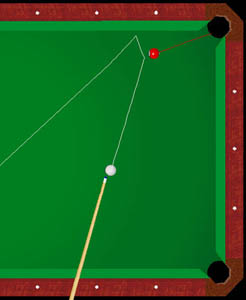
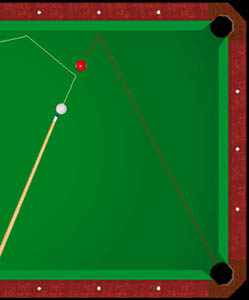
or more rails then into a pocket, you’ve just pulled off a bank shot. The
basic technique for aiming bank shots is to first assume that the ball will
rebound at the same angle that it hits the cushion.
This can be used to estimate the angle; however, pool tables bank shorter
than a mirrored rebound angle. Making banks seems easy if an adjustment is made
for the shortened bank angle. Unfortunately it is not that simple. The path of
the banked ball can actually curve after the ball hits the rail.
Any
spin in the vertical axis (forward or backward) will cause the ball to curve
after striking the rail. The amount of curve is dependent on the ratio of spin
to the velocity of the ball. The higher the spin in relation to velocity, the
more the ball curves. Note that what is meant by forward spin here means any
rotation forward, and rolling is a rotation forward. Backward spin on an object
ball is negligible and can only be caused by spin transfer. You can demonstrate
what backward spin does by hitting the cue ball into the rail with draw spin.
This shot is useful when kicking at balls.
Banks
are also be affected by English. This is covered in the Advanced
Techniques chapter under the Spin
Transfer
section.
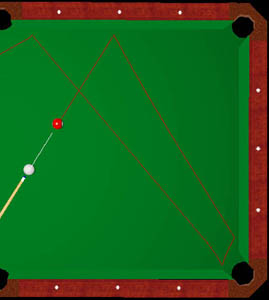
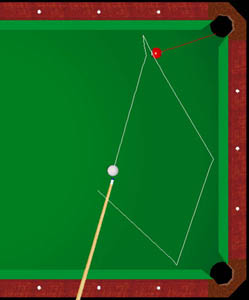
Shown
below is a shot hit center-ball with a firm stroke. With the object ball close
to the rail it will not have much forward roll before striking the rail.
Therefore, there is little curvature after rail contact. Notice the bank angle
is not a mirror image and the ball has banked short of the input angle.
The
same angle bank with the object ball further from the rail and the same speed
stroke misses the pocket. The friction of the table causes the object ball to
start rolling causing the ball to curve forward after hitting the rail.
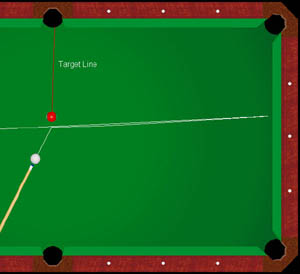
After
contact with the object ball, the cue ball always starts on a path perpendicular
to the target line. The target line
is the line the object ball takes. The cue ball then curves forward or backwards
depending on the spin on the cue ball in the vertical axis (follow or draw).
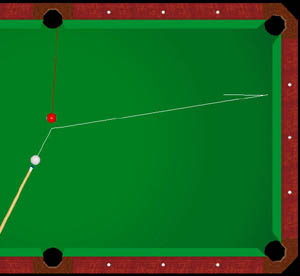
Shown
below is the cue struck very firmly with a center-ball hit. It starts
perpendicular to the target line and stays close to that line because the cue
ball has very little forward spin. Even though the cue was hit in the center, it
gets forward spin from the friction on the table. The curvature forward after
contact with the object ball is determined by the ratio of spin to linear
velocity. Linear velocity is the speed the ball is moving. This example has very
little spin in relation to the velocity because the cue ball is struck firmly
and is close to the 3 ball. Moving the cue further away from the 3 ball and
striking the cue at the same speed will result in more curvature because the
farther the cue travels before hitting the 3 ball, the more it induces forward
spin. The spin is induced by the friction between the cue ball and the table.
OK, so this is a little complicated. Don’t worry about the why, just learn
what happens and you’ll be a better player.
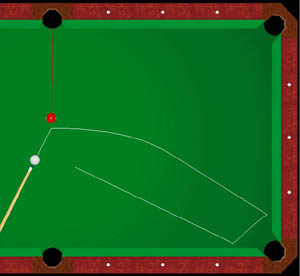
Shown
below is the same shot with the cue ball struck easier. Now the ratio of spin to
velocity is higher and the ball curves forward more.
For
straight-in shots, ‘‘drawing’‘ the cue ball by hitting it below-center
will bring the cue ball back towards you. ‘‘Follow,’‘
which is applied by hitting the cue ball above-center, will move the cue ball
forward, away from you. The farther
away from center you hit the cue ball, the more spin will be applied given the
same stroke speed is used. The actual spin is determined by cue offset from
center, stroke speed, and distance between cue and object balls. You’ll need
to practice your stroke speed to get consistent results.
With
shots at an angle, draw and follow affect how the cue ball curves off of the
perpendicular line.
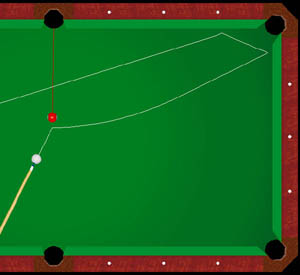
Shown
below is a draw shot which pulls back from the perpendicular line:
Follow
shots will curve forward from the perpendicular line:
As
the angle of the shot increases, draw and follow have less effect on the cue
ball path.
(Getting
Confused? Don’t worry, it’ll
become clear when you try it yourself. Feel
free to play around with these options; take some time to give yourself a feel
for choosing and setting up a useful spin.)
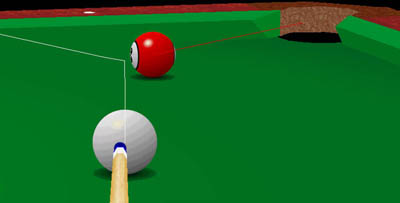
Draw
and follow can be put on the cue ball by pressing and holding the E
key and then moving the mouse to change the cue tip position vertically on the
cue ball. The blue dot on the cue
ball shows where the cue tip will hit.
You
can apply English (side spin) by hitting the cue ball off center to the left
(for left spin) or to the right (for right spin).
It’s much easier in a precision computer environment than with a real
cue - this is your big chance to try out all those shots and tricks that experts
use.
English primarily effects cue ball path when the rail is hit. You may remember from the last section on Draw and Follow, that they affect the cue ball’s path more when shots are straighter. So, what to do on shots with lots of cut? Cut shots will usually hit the rail. So use English to change the cue ball path for shots with more cut.
To
put English on the cue ball, hold the E
key and move the mouse. The blue
dot on the cue ball will show where the cue tip will hit.
English has its greatest effect on cue ball path when a rail is hit, as
it changes the angle at which the cue ball rebounds from the rail.
Plus, it can add or remove speed from the cue ball.
Shown
below is a rail shot hit center-ball:
The
same shot with left English moves the path left off the rail:
The
same shot with right English moves the path right off the rail:
A
combination is a shot where two or more object balls are hit in sequence to
pocket an object ball.
To
line up a two-ball combination, first figure out the necessary ‘‘contact
point’‘ on the second ball - the spot on the ball where you must hit it so
that it will shoot into the pocket. Then
determine the contact point on the first ball that will cause it to hit the
second ball’s contact point. Now
aim the cue ball at the first ball’s contact point.
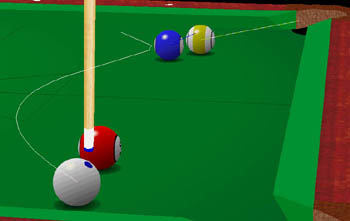
A
carom shot is where a ball (cue or object) hits off another ball.

Use
the knowledge learned from the Cue
Ball Path
section to become proficient at caroms.
In
pool, a kiss is a carom shot where two object balls are frozen together
(touching each other) and a perpendicular line between them goes into a pocket.
Just hit the object ball on the side of the ball opposite the pocket and
it’s in. Shown below is a typical
kiss shot.
Virtual
Pool 3 is so realistic that it accurately models even the more obscure physical
properties of a real pool table. This
section reveals some unusual details that are not general knowledge outside of
the realm of professional pool players.
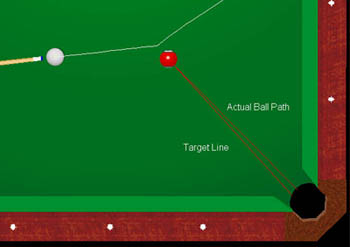
Balls
are thrown off-line by the friction between balls.
If the cue ball hits an object ball at an angle, the friction between the
balls throws the object ball path off the target line. The picture below
illustrates this concept showing the actual target line (target line determined
by a line through the centers of cue and object ball at time of contact) and the
actual ball path:
The
amount of ball throw depends on the angle of the shot, the English on the cue
ball and the speed of the cue ball. See Spin
Transfer
for information on how English affects ball throw. More angle will mean more
throw. Higher velocity reduces ball throw.
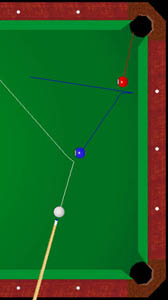
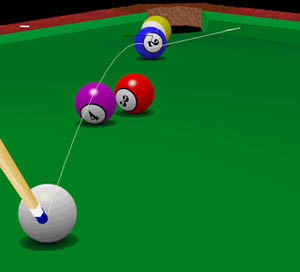
The
same friction which makes an object ball ‘‘throw’‘ also transfers spin
from ball to ball. It’s a small
difference, but if you want to be a pro you’ve got to pay attention to every
detail; in other words, when you’re using English, you should remember to
compensate for Spin Transfer when you’re lining up your shot. Shown below are
two bank shots hit with the same line and speed. The first shot is hit
center-ball:

The
second shot is hit with left English:
The
rebound angle of the second shot is increased because of the spin transfer from
the cue ball to the object ball. Left spin on the cue ball is transferred to the
object ball as right spin, causing the rebound angle to increase.
You
can use English to offset ball throw (see Ball
Throw). In
the picture below, a small amount of left English is being applied to the cue
ball to remove the throw effect. This happens because the angular velocity at
the contact point cancels the linear velocity resulting in no friction and no
ball throw.
The
effect of ball throw (see Ball
Throw) is
not the only aiming complication when using English. When the cue ball is hit
with English it will squirt off line. If you hit the ball on the right side of
the cue ball, it will squirt left. The amount of squirt is depends on the
horizontal cue tip position and the velocity of the stroke. The picture below
shows the cue ball hit straight along the head string line with left English.
Observe how the cue ball path squirts to the right.
You’ll
need to practice a lot to get a feel for playing shots with English.
Hitting
downward on the cue ball by raising the butt of the cue and causing the cue ball
to curve is called a masse’ shot. (This
is the kind of shot banned by many house rules because inexperienced players are
quite likely to miss the ball completely, stabbing down with the cue stick and
tearing a gash in the table’s felt!) The
cue ball will curve in the direction of any English applied to the ball;
therefore, a masse’ shot hit to the right side of the cue ball will curve to
the right and so on. How much the ball curves, how sharp the curve is, and how
fast the cue ball moves are of course determined by:
·
The angle of
the butt of the cue stick
·
The cue tip
position
·
The speed of
the stroke
Masse’
shots are difficult to master, but with some work they can be quite effective.
Hitting
downward on the cue ball by raising the butt of the cue and bouncing the ball
off the table into the air is called a jump shot. This shot is legal as long as
the cue ball is bounced off the table. Jumping balls by using the cue stick to
dig under and miscue is illegal. Jump shots are a lot like Masse’ shots in
that the butt of the cue must be raised.
The
main difference is how much the cue ball gets pinched between the cue tip and
the table. If there is significant pinch, the cue ball can’t jump because the
cue tip is in the way and the ball will Masse’. If there is little pinch, the
ball will jump. It is possible, and quite common, to get a little jump in
conjunction with a Masse’. The secret to jump shots is getting the correct
butt angle. This, along with cue tip position and stroke speed, will produce
differing launch angles and jump distances. Turn on tracking and play with jump
shots before attempting them in a game.
Use
the Amplify feature when breaking (taking the first shot of the game).
Practice
with Tracking on until you feel comfortable lining up shots yourself. Experiment
with Tracking.
Line
up difficult shots without Tracking, then turn Tracking on to see how close you
came. Remember, anything you learn
here can be applied to a real pool table.
Use
the Replay feature to see how you can correct missed shots.
The
force with which you strike the cue ball has an effect on the path the cue ball
will take, especially when you add some draw, follow, or English.
Use Tracking to experiment with varying force and different cue tip
positions.
Be
conservative with cue tip placements and shot power. Remember, the player who
best controls the cue ball is the superior player.
Practice
masse’ shots and jump shots before attempting them in games. They are very
difficult and practice gives you a feel for the shot.
Practice
banks using varying speed to get a feel for the rail and ball curvature effects
on banks.